At this point you have some files, containig beautifully structured HTML and pictures of cute cats. But that's not enough we say! Give it all some styling love.
Challenge
Use CSS to format texts and manipulate page layout.
How to do it
HTML is a language for structuring content. To control how our content looks, we use CSS (Cascading Style Sheets). First, you have to create a new file in your repository. Create the folder css and in it the file style.css.

Edit this file and place the following code inside:
h1 {
    color: hotpink;
}
We will explain this in a minute, but first switch to your layout file, default.html. Here we will add a <link> element to our HTML head, that tells the browser where to get the style information.
<!DOCTYPE html>
<html>
    <head>
        <meta charset="UTF-8" />
        <title>{{ site.title }}</title>
        <link rel="stylesheet" href="/css/style.css" />
    </head>
    ...
This connects the stylesheet to your HTML pages. Now reload the browser tab with your site and marvel at your new shiny hotpink headline!
When you take a look at the CSS code above, you surely already figured out the basic concept of CSS. Let's have a closer look anyway:
Font formatting
h1 is a selector. It selects the HTML element we wish to style. After that, in curly braces, we assigned the value hotpink to the property color. With this short CSS declaration you changed all h1 elements in your site to be hotpink. So hot!
Now try it with another selector. Change all your paragraphs to be "skyblue"! Add another CSS declaration after the first one, then reload your page:
p {
    color: skyblue;
}
You can address every HTML element used in your pages in the same way. This type of selector is called element selector, but there are more. Let's stick to this one for the moment.
In addition to text color you can assign other font formattings. Let's extend the style of your h1:
h1 {
    color: hotpink;
    font-size: 44px;
    text-transform: uppercase;
}
The different declarations you just added are quite self-explanatory. Keep an eye on the colons between the property name and value, and on the semi-colon at the end of each declaration.
Ask your coaches for more info about text formatting! There is much more to know.
If you have a peer
To recap some of the things you learned today, you could now take a look at your peer's repository and play with his CSS. Let's make his page more colorful!
Borders and Margins
Text formatting is easy, let's move on to something more advanced: the box model. We need an example to see all the parts of a CSS box, so we will use the h1 selector again. Put this CSS in your style.css:
h1 {
    color: hotpink;
    font-size: 44px;
    text-transform: uppercase;

    border: 1px solid red;
    margin: 10px;
    padding: 5px;
}
What did you just do?
- border adds a border around the element
- margin adds spacing to the outside of the element
- padding adds spacing inside, between the content of the element and its border
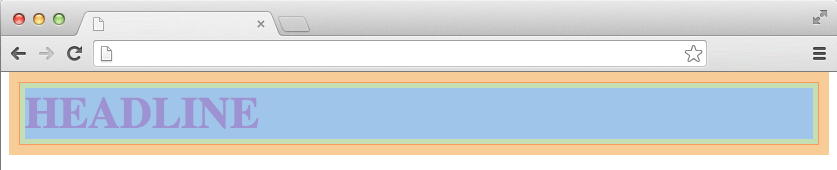
In this image we highlighted the different parts for you - orange marks the margin, the red line is the border and the smaller geen area is the padding. The content of the element itself is shown in blue.
We set the margin to be 10px wide on each side, and the padding to 5px. But you can adjust the values for the four sides of the box separately:
padding: 10px 5px 3px 2px;
Here we have four values, one for each side. The values are applied clockwise starting from the top. The same could be written in four separate declarations, like this:
padding-top: 10px;
padding-right: 5px;
padding-bottom: 3px;
padding-left: 2px;
The result would be the same, but the first one obviously is shorter - that's why this notation is called "shorthand".
It can get even shorter if two sides opposite to each other have the same values. So this:
margin: 20px 10px 20px 10px;
could be shortened to this:
margin: 20px 10px;
because top and bottom as well as left and right margins have the same values.
Ask your coaches for more info about box styling! There is much more to know.
Browser styles
You surely have noticed that the elements on your pages already have some styling to them, even before you applied a stylesheet to your document. For example the headlines are bigger than paragraphs, and there already is some spacing between the elements.
This is because the browser wants to be helpful and provides a special stylesheet to every page, the user agent stylesheet. This way every HTML document that is well structured with appropriate HTML elements will be displayed in a way that makes it easily readable. This user agent stylesheet is the base layer that you are building on with your own CSS styles. Sometimes you overwrite the CSS styling of the browser.
You can even overwrite your own styles! If you place two blocks in your stylesheet that use the same selector, the second one will "win".
There is a convenient way to examine each element on your page and see which styles are applied to it. This is also an excellent way to learn more CSS properties to manipulate.
Try right clicking on a headline in your browser. In Chrome and Firefox there should be an option labeled 'Inspect Element'. Klick on it and see what happens.
Ask your coach to show you around the developer tools!
Where to go from here
Let us repeat this again: ask your coaches for more information. HTML and CSS alone can easily fill a two-day workshop. There will be OpenTechSchool events for these topics, and we hope you became curious to learn more about them.
If you want to look up CSS properties to use now, you can visit the Mozilla Developer Network (MDN). There you will find a CSS reference, that lists all properties, as well as some tutorials and explanations on topics like the box model.
You will find more links on the "Find more treasures" page.