Introducing Jupyter Notebook
Jupyter Notebook
Until now we’ve worked with Python either directly via the interactive Python console, or by writing Python programs using a text editor.
However, there are other ways to work with Python. Jupyter is a set of tools originally developed to make it easier for scientists to work with Python and data. It allows you to combine interactive Python exploration with prewritten programs and even text and equations for documentation.
Jupyter isn’t a different programming language, it’s just a set of computer programs for working with the Python language.
Sneak Preview of Jupyter

(This is just an example of what Jupyter Notebook can do, don’t feel like you need to understand it just yet! If you want to type it into Jupyter Notebook later on, type the special command %matplotlib inline before you start - there’s an explanation coming up in the Charts chapter.)
Installing Jupyter Notebook
There are a number of ways to install Jupyter Notebook.
If you’re using OS X or Windows, we recommend you download and install Anaconda, which is a free bundled installer of Python together with many other useful tools (including Jupyter Notebook.)
Anaconda is a fairly large (around 300Mb) download so if you’re at a workshop event we’ll have some USB keys with the predownloaded installers to save on bandwidth
Anaconda comes with its own version of Python 2.7, Jupyter Notebook, plus other libraries like matplotlib and a package manager (“conda”) that you can use to install other packages or other Python versions.
If you’re using Linux, Anaconda is available as an option but we recommend you try to install the programs using your Linux distribution instead (see under “Alternative Options”, below.)
Alternative Options
This section is only if you don’t want to or can’t use Anaconda
Anaconda (described above) is the easiest option for this workshop. There are some other installer options that you can test out if you’d like to try something different:
-
If you’re on Linux, most package managers include Jupyter Notebook. For instance on Ubuntu or Debian:
sudo apt-get install jupyter-notebook python-matplotlib -
If you have ‘pip’ installed (maybe from another OTS workshop) then you may be able to install Jupyter by itself (plus matplotlib) via ‘pip’, as follows:
pip install jupyter
(If you’re on OS X you may need Xcode to compile dependencies.)
- If you can’t get Jupyter Notebook to work on your computer at all, there’s a hosted service called Wakari that you can use for free. In this case your programs won’t be running on your own computer, they’ll be running “in the cloud” (i.e. on Wakari’s servers somewhere else) and you’ll just see the results in your web browser.
Note about Python 3
Anaconda and some of the other installers come with Python version 2. You may have been using Python version 3 up until now, this is the version that the Introduction to Programming workshop encourages you to use.
The Python world is slowly migrating towards using Python 3 for everything. Jupyter is available for both 2 & 3, but Anaconda comes with Python 2 as it includes some components which are still Python 2 only.
Python 2 and Python 3 have some minor incompatible differences in language syntax. The programs shown in this workshop are designed to work with both, but if you find some code that doesn’t work (but perhaps works on your neighbour’s computer) then this may be why.
Starting Jupyter Notebook
You interact with Jupyter Notebook using your web browser. The Notebook program creates a “web server” locally on your computer that you then connect to.
On Windows, you can find a launcher for Jupyter Notebook under Anaconda in the Start menu.
On Linux or OS X, you can start Jupyter Notebook from the command line. First open a terminal window, use ‘cd’ to navigate to the directory where you want to store your Python files and notebook document files. Then run this command:
jupyter notebook
You should see some output like this:
[NotebookApp] Using existing profile dir: u'/home/gus/.ipython/profile_default'
[NotebookApp] Serving notebooks from /home/gus/workshops
[NotebookApp] The Jupyter Notebook is running at: http://127.0.0.1:8888/
[NotebookApp] Use Control-C to stop this server and shut down all kernels.
A browser window may automatically open showing the Jupyter Notebook interface. If it doesn’t open, you can copy-paste the “http” address from the output and paste it into your browser.
Even though you’re interacting with Jupyter Notebook using your browser, Notebook is running right there on your computer in that window. Only you have access to it.
First Steps with Notebook
In your browser, click the “New Notebook” button and a new notebook will open up.
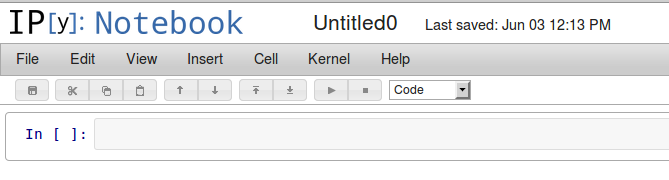
The empty box at the top is the first “cell” for entering Python code.
Try typing something like print("Hello World") into the cell. To run the code in the cell and see the output, click the Run button (play icon) on the toolbar, or type Shift-Enter:
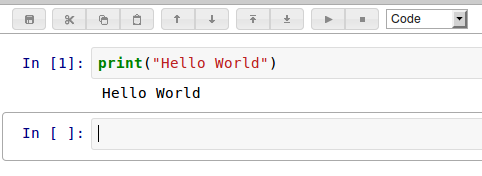
You’ll see that whenever you run a cell, a new empty cell appears where you can enter another set of Python statements. Try assigning a variable. Let’s make another shopping list:
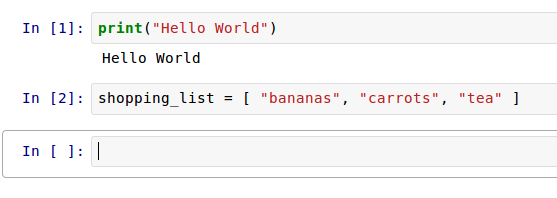
When you Run this cell you won’t see any output, but behind the scenes the variable “shopping list” has been assigned.
We can see this by making a third cell to print the contents:
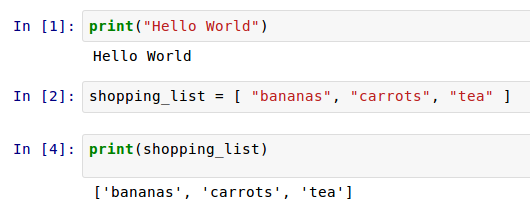
You can do anything with Jupyter Notebook cells that you’d do with normal Python code. As you build up the notebook full of cells you create a history of the things you’ve done and the results that were printed.
Jupyter Notebook Directory
When Jupyter Notebook starts up it prints a line like this:
[NotebookApp] Serving notebooks from /home/gus/workshops
This is the directory that it was started from, and it’s the working directory for loading Python files, text files, etc.
It can be helpful to make sure this directory is the directory where you plan to keep files related to your work.
On Windows with Anaconda this directory is called “Jupyter Notebooks” inside “My Documents”, and is created when you install Anaconda. On OS X, Linux or other Windows installations it’s up to you which directory you use.
If you’re launching from the command line, you can ‘cd’ to this directory before you launch Notebook.
If you’re using the command line on Windows, you can use Explorer to find your directory, then hold shift+right click. The context menu that comes up should have an option to “Start a command prompt here”.
Loading Notebook Files
You can also load Jupyter Notebooks that other people have created, saved as Jupyter Notebook files (File extension .ipynb.) Try downloading and opening this Notebook file with the shopping list example.
After you download the Notebook file, move it into your Jupyter Notebook working directory and then choose File -> Open in Notebook to open it.
That Notebook contains some additional code, and some suggestions for changes you can make by going back and editing the existing files. Take a few moments to play with the Notebook - rerun the cells, edit the cells to change them, don’t be afraid to break things!
Loading Python Files
You can also load a pre-existing Python file into an Jupyter Notebook cell by typing
%load "myprogram.py"
Into a cell and running it. This loads up a new cell containing the contents of myprogram.py.
Test this feature out by loading one of the scripts you wrote during the recap session. You may have to specify the full path to the script file, depending on the directory Jupyter Notebook started up from.
There is one other useful built-in tool for working with Python files:
%run "myprogram.py"
This will run myprogram.py and load the output into a Notebook cell.
Other Jupyter tips
-
As well as Shift-Enter there are other keyboard shortcuts in Notebook. Look under the Help menu -> Keyboard Shortcuts to see them all.
-
In previous workshops we used
help()to view help information in the Python interpreter. Jupyter Notebook makes this even simpler, you can just type the name of a Python function or module and end it with a?. Try it now, typerange?into a cell and run it. -
Using a nifty tool called NBViewer you can easily share Jupyter Notebooks on the internet, rendered as web pages (but still downloadable to play with in Jupyter.) Check out the NBViewer home page or the Jupyter Notebook gallery for some interesting ones.
Other Ways to Run Jupyter
Other options if you feel like exploring:
-
There is a command line “ipython” program (just run
ipythonwithout the –notebook argument) that behaves similarly to the “python” interactive shell, but with some of the nice features of Jupyter Notebook (although none of the graphical features.) -
There is a graphical Jupyter program (ie not web browser based) called “Jupyter QtConsole”. It’s like the command line Jupyter but with some graphical features. Launch this one by running
jupyter qtconsole.
Doing the workshop without Jupyter
Tried out Jupyter Notebook but don’t really like it? No problem! The rest of the workshop can be completed without using Jupyter Notebook at all, feel free to go back to the Python coding tools you were using already.
Next Chapter
Time to give Notebook a real workout! The next chapter is Working With Text Files