We will learn how to build your HTML slide show, and then learn how to use JavaScript to make content dynamic and interactive.
For this project, we will create a photo slide show. You’ll have more fun if your slide show is made from your own photos, or at least photos you like. So step one is:
Get some nice photos to use in your slide show.
Create a directory for your entire project and call it “slideshow”.
Download three photos from the internet and save them in your slideshow directory.
The photos must:
If you need help downloading photos, ask a coach for help.
When viewing a photo page, right click and view the “Medium 500” or “Medium 640” size. From the next screen, download the image into your slideshow directory.
Go to http://web.stagram.com/n/YOUR_USERNAME and download three “L” size photos. (They are all 612 pixels wide and 612 pixels tall.)
Use these photos:
We will start our slide show with just three photos. To make things simpler, we want them to be not too big, and not odd sizes.
Understand how to display static content by writing HTML.
In your editor, open a new file.
Save the file with the name “index.html” in your slideshow directory
Add your photos to the HTML by adding three lines like this:
<img src="FILE_NAME_OF_THE_FIRST_PHOTO">
<img src="FILE_NAME_OF_THE_SECOND_PHOTO">
<img src="FILE_NAME_OF_THE_THIRD_PHOTO">
You must use the complete file name which includes the file extension, which will be .jpg, .gif or .png.
In Chrome, go to File ▸ Open File…, find
your slideshow/index.html file and open it.
In your text editor, at the very top of the index.html file,
before the <img> tags, add:
<!doctype html>
<head>
  <title>I ♥ Coding</title>
</head>
In Chrome, refresh the page, and take a look at the title of the tab.
In your text editor, add another line to the head that sets the character set to UTF-8:
<!doctype html>
<head>
  <title>I ♥ Coding</title>
  <meta charset="utf-8">
</head>
In Chrome, refresh the page, and take another look at the title of the tab.
You’ve written some HTML and are looking at it in your browser!
You’ve also added a title, and defined the character set so that UTF-8 characters are correctly displayed. (UTF-8 is important not just for hearts, but also for umlauts.)
The first line, the doctype declaration, is important
for a similar reason as setting the character set. This simple line
tells the browser what exact flavor of HTML we have written, so the
browser will treat it in a predictable way.
To see that CSS can be used to position content.
In your editor, create a new file and save it with the name “style.css” in your slideshow directory.
In your style.css, add these CSS rules:
.picture-frame {
  height: 344px; /* height of one image */
  width: 500px;  /* width of one image */
  overflow: hidden;
  margin: 50px auto;
  position: relative;
}

.film-roll {
  width: 1500px; /* 3 times width of one image */
  left: 0px;
  top: 0px;
  position: absolute;
}

img {
  float: left;
}
Change the height and width values to match the height and width in pixels of your photos. There are three values you must change.
Update your index.html file by adding a link to the
style.css stylesheet in the head, and by wrapping your
<img> tags in two <div> containers
with classes “picture-frame” and “film-roll”:
<!doctype html>
<head>
  <title>I ♥ Coding</title>
  <meta charset="utf-8">
  <link rel="stylesheet" href="style.css">
</head>

<div class="picture-frame">
  <div class="film-roll">
    <img src="…">
    <img src="…">
    <img src="…">
  </div>
</div>
In Chrome, refresh the page.
In Chrome, open the console.
In the console, go the the left-most tab called “Elements”. Click
on the arrows (▸) to look inside the
<body>…</body>. Keep exploring until you find your
<img> tags. It will look almost like this:
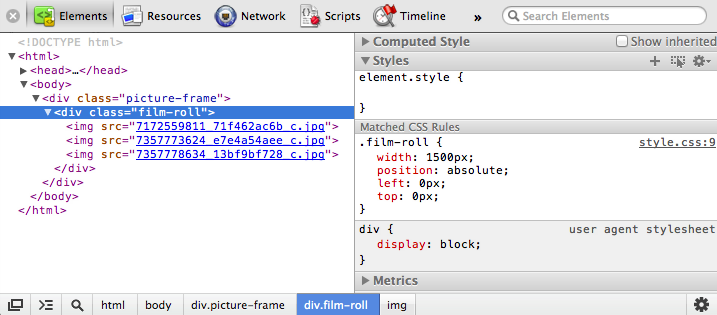
Look at the right column and notice that you can see CSS rules that are defined in your style.css file.
While selecting <div class="film-roll">, access the
value of the left property in the right column, and change the
value from 0px to 50px. Then try -50px. Try using the up and down
arrows while changing the value of the left property.
Refresh the page to reset all the styles.
Play with more CSS values in other rules on other elements. Turn styles on and off using the checkboxes. What does each property do?
Earlier, we saw that a CSS rule that looked like
p { … } targeted paragraphs. Rules that start with a dot,
like .class-name { … }, target elements with
class-name as their class attribute.
By using class names, we can control two <div> tags
in completely different ways, and we can also use this control to position
the elements.
Using some advanced techniques for positioning elements, we have created a “picture frame” that has a height and width that exactly match our photo size:
.picture-frame {
  height: 334px;
  width: 500px;
  …
}
Inside of the picture frame, we created a “film roll” that is a long strip of all our photos:
.film-roll {
  width: 1500px;
  left: 0px;
  …
}
By changing the position (by setting the left property)
of the film roll, we can make our photos slide back and forth inside
the picture frame. The film roll is set to start at position “0”.
(That is what is meant by left: 0px;
We can adjust the CSS in the stylesheet, and we can adjust the CSS by hand in the Developer Tools, but (so exciting!) we also adjust the CSS using JavaScript. Ready to try?? Let’s do it!
To see that you can create a reference an HTML element, and explore the element’s properties in the console.
In your index.html, add the id the-film-roll to
the <div> with class film-roll:
<div class="film-roll" id="the-film-roll">
Back in the Console tab of the Developer Tools, type:
var filmroll = document.getElementById('the-film-roll');
Then type, one line at a time. Some lines may have an unexpected effect (or unexpectedly no effect).
filmroll;
filmroll.offsetLeft;
filmroll.offsetLeft = -100;
filmroll.offsetLeft;
filmroll.style.left = '-100px';
filmroll.offsetLeft;
filmroll.style.top = '50px';
Try moving filmroll 700 pixels toward the
left.
Try setting other style properties to other values.
Refresh the page. Type the following in the console:
filmroll.style.left = '-100px';
What happened to our friend filmroll?
When JavaScript runs in the browser, the browser creates an
environment variable called document, which has many useful
properties that we can use to access elements on the page. We can use
the getElementById method to get a reference to the
element with an ID of our choosing.
Here, we added an ID to the film roll element, and then used that ID to create a reference that we could control with JavaScript.
Once we have a reference to the <div> with id the-film-roll,
we can access its properties too, because it is an object of the kind we
learned about yesterday. Some of the properties (like
offsetLeft) are read only, meaning we can’t change
the value. Some (maybe you found some) can be changed. Other properties,
like style have properties themselves.
The style property allows us to control the CSS
properties on an element. Therefore, by creating references to an
element (an HTML element) we can change its appearance and position
(by setting its CSS properties).
The moment we refresh the page, we get a whole new environment and all of the variables we created are gone. How can we create variables without typing them in the console? There must be a way!
HTML in one page, CSS in the stylesheet, but how can we load our JavaScript programs? Let’s find out!